New Stampin’ Up! Catalog Day and Join Special

New Stampin’ Up! Catalog Day + A Special Join Offer

There’s a lot happening today, and it’s one of those days that feels full of fresh inspiration.  It’s new Stampin’ Up! catalog day, and there’s so much to look through and enjoy.

If you’re anything like me, flipping through a new catalog brings a mix of ideas and possibilities.  It’s hard not to start thinking about what you’d like to try first.

New Stampin' Up! Catalog Day - Stamp4Joy.com
New Catalog Inspiration

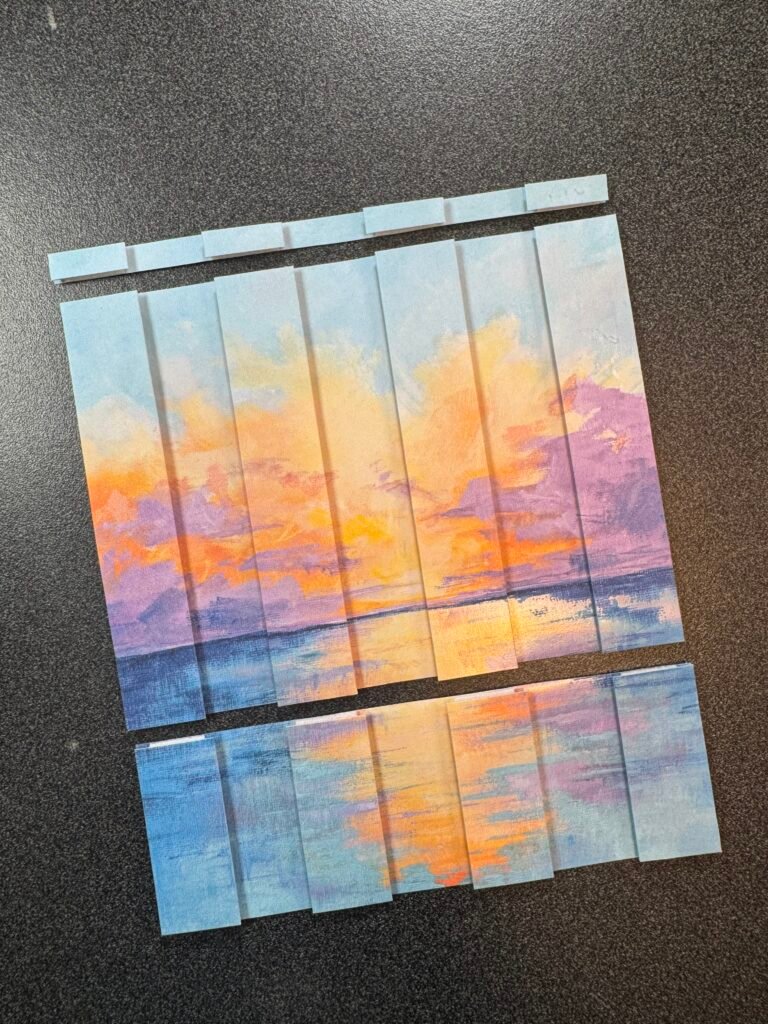
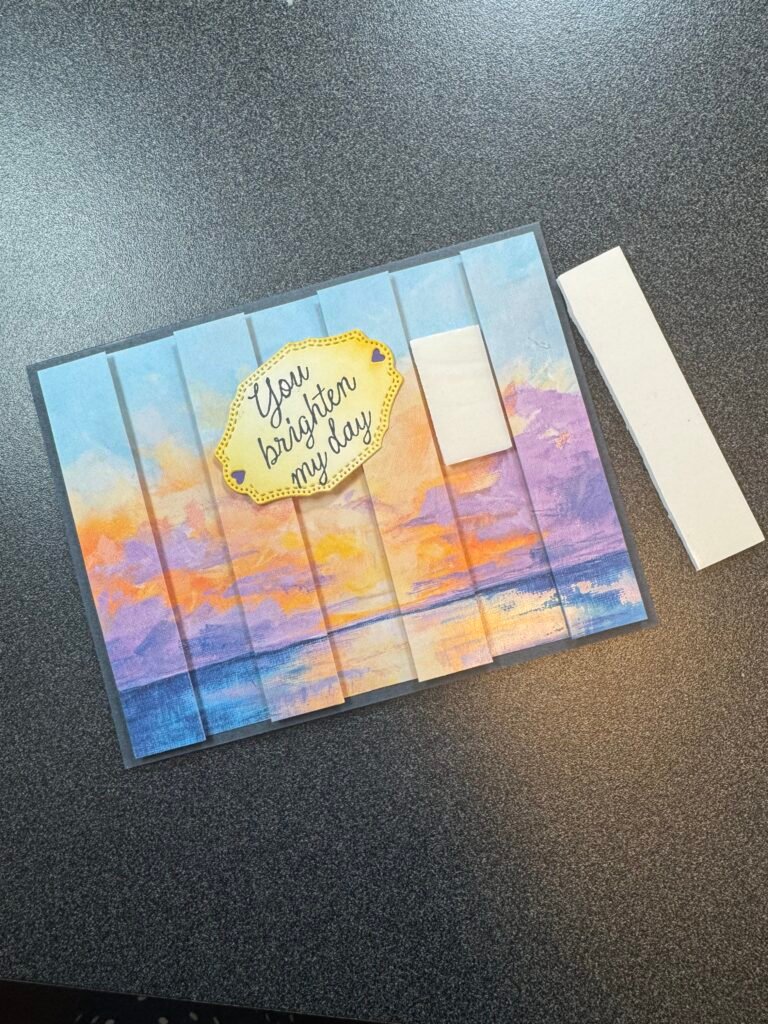
The new catalog introduces fresh colors, new products, and creative ideas to explore.  It’s the kind of release that makes you want to sit down and create, even if you only have a little time.

You might find a new favorite stamp set.  Or maybe it’s a paper collection that sparks an idea.  Sometimes it’s just one small detail that gets everything started.

A Join Offer to Take a Look At

Along with the new Stampin’ Up! catalog day there’s also a special join offer right now.

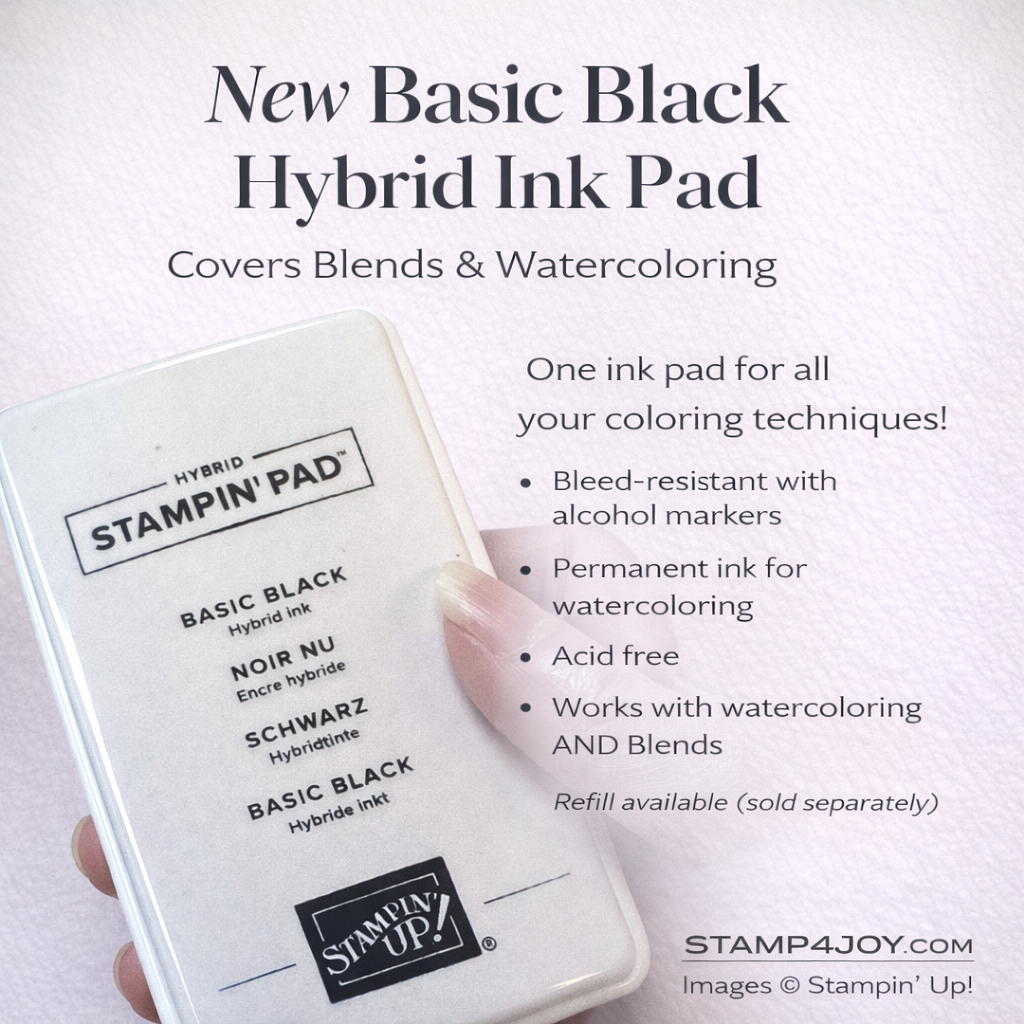
When you join as a demonstrator you’ll receive the new 2026–2028 In Color Stampin’ Pads free as part of your Starter Kit.  If you’d prefer something different you can choose an extra $35 in products instead.  It’s a simple way to start with items you’ll actually use.

What You’ll Enjoy as a Demonstrator

There are also ongoing benefits that come with joining.

You’ll receive a 20–25% discount on products and get early access to new releases and catalogs.  There’s also the ability to earn extra commission, along with access to training and events.

It’s a flexible way to enjoy your crafting a little more — and you can make it exactly what you want it to be.  You can keep it simple and just enjoy the discount or you can explore it a little more.  It’s easy to make your own.

Take a Look When You’re Ready

New Stampin’ Up! catalog day always brings a fresh start.

If you’ve been thinking about trying something new, this might be a good time to take a look and see what catches your eye.

👉 Learn More Here

Virtual Creative Party for Card Makers (Join Me Live!)

Virtual Creative Party for Card Makers

Sometimes you just need a little spark to get back into creating — and that’s exactly what this Virtual Creative Party is all about.

I’m hosting a relaxed, live event where you can simply sit back, watch, and enjoy a bit of creative time.  No pressure.  No prep.  Just ideas and inspiration you can take with you.

Virtual Creative Party - Stamp4Joy.com

If you’ve been wanting to create but haven’t quite gotten started, this is a nice way to ease back in.

What to Expect

During the party I’ll be sharing a few simple project ideas and showing how they come together.  I’ll also be introducing some of the new products from the May–August catalog and the latest Online Exclusives.

This is not a step-by-step class. Instead, it’s more about seeing possibilities, gathering ideas, and enjoying the process.

Here’s what you can look forward to:

  • A few simple project demonstrations
  • Fresh inspiration using new products
  • A relaxed, watch-and-enjoy format
  • A couple of prize drawings
Virtual Creative Party Details
  • Saturday, May 9
  • 10:00–11:00 AM Pacific (1:00-2:00 PM Eastern)
  • Live on Zoom

This event is designed for my customers and fellow hobby crafters.  I’m not able to include Stampin’ Up! demonstrators for this one.

You don’t need to have anything ready or craft along.  Just come as you are and enjoy a little creative break.

You're Invited!

If you’d enjoy a little creative time without any pressure I’d love to have you join me.

It’s simply a chance to relax, watch a few ideas come together, and maybe feel inspired to create something of your own afterward.

Click the link below to register so you can join us live.  I hope you can make it!

Grab Your Spot

Photo Card Ideas with the Capturing Smiles Bundle

Photo card ideas using simple layers and fun details

These photo card ideas came together after seeing some adorable vacation pictures from my niece’s family.  I couldn’t resist turning them into something a little more special.

The Capturing Smiles Bundle was perfect for this.  It’s made for moments like these.

I started by die cutting a couple of the film strips for each card.  I overlapped them slightly so they would fit nicely on the card front, and it worked out just right for five smaller photos.

Photo card ideas with a sketch to get started

These cards began with a sketch from Freshly Made Sketches, which gave me a great starting point for arranging everything.  I always love using a sketch when I want a little direction without overthinking it.

If you’d like to try it too, you can check out the sketch by clicking on the image to the right.

From there, I assembled the cameras — hers in Bubble Bath and his in Coastal Cabana.  I added the sentiment “looking good” in the center of the lens, and “photo op” tucked just underneath on the right.

The main sentiment, “love this smile,” felt perfect for these photos.

Everything came together in a way that feels fun and personal, but still simple to put together.

I also created a handmade friendship card using the same bundle, along with the Cutest Crew, which was a fun way to stretch these supplies even further.

Do you ever turn photos into cards, or do you usually keep them for scrapbooking?

Floral Thank You Card with Simple Layers and Texture

Floral thank you card idea with soft layers and texture

This floral thank you card idea started with a sketch, even though I didn’t end up submitting it in time.  Oh well… it was still fun to work from!

I used Lovely Blossoms Designer Paper for this card, and I love how easy it makes everything coordinate.  The striped pattern on the background actually comes from the reverse side of the paper I used for the flowers.

For the focal point I fussy cut the flowers and leaves from one of the cut-apart sheets.  It’s a simple step, but it really helps create a soft layered look without needing a lot of extra pieces.

Floral thank you card idea details that add interest

Behind the flowers I added a lattice-style die cut using one of the upcoming Lily of the Valley Dies.  I actually cut two and overlapped them slightly to create more texture and depth.

The “Thank You” sentiment comes from the Lovely Arrangements Bundle and was cut using the coordinating die.  I like how the white sentiment ties in with the white flowers and keeps everything feeling clean.

Both the flowers and sentiment were popped up with Stampin’ Dimensionals to give the card a little extra lift.

To finish it off I added a few Secret Sea Flat Pearls for a soft bit of shine.

Looking at it now, I’m wondering if I should have moved the flowers up just a bit… but sometimes it’s nice to leave things as they are.

What do you think — would you have shifted them or left it as is?

Here's a simple birthday card I created using the same bundle.

Card Making Mistakes and How I Fixed Them

When card making mistakes happen… and they will!

Card making mistakes happen to all of us, and this project had a few along the way.

I started with a card making technique where you cut your image into strips and layer them over a full background to create dimension.  It’s such a fun look, and I knew I wanted to try it with this beautiful scene.

I trimmed two matching pieces of 6″ x 6″ designer paper from Scenic Coast to 5-1/4″ wide, then cut one of them into 3/4″ vertical strips.  I used four of those strips for the card front, saving every other one for another project.

Card Making Mistakes - Stamp4Joy.com
Card making mistakes and how I fixed them

Everything was going smoothly… until it wasn’t.

After applying Foam Adhesive Sheets to the last strip I realized I had attached it to the wrong side.  Not ideal.

A little careful “surgery” helped remove most of it, but there was still some sticky foam left near the top.  I used my Embossing Buddy to take away the tackiness, then gently cleaned up the rest with a craft eraser.  Good as new!

Then came mistake number two.

Card Making Mistake Two - Stamp4Joy.com
Attaching the Greeting - Stamp4Joy.com

After attaching the strips to the full background (skipping every other space for that dimensional look), I realized the full piece was still 6″ tall instead of 4-1/4″.  Oh, no!

I ended up trimming it down using my Paper Trimmer and finished the cut with my.  Not perfect, but it worked.

From there everything came together nicely.  A couple small strips of Gorgeous Grape Cardstock was placed behind the small hearts on the sentiment so they'd stand out.  Then I added a couple stamped sailboats, a softly blended sentiment label (with Foam Adhesive Strip between two raised areas for it to rest on), and then a few sequins to finish it off.

I did have a larger boat die cut that I ended up not using on the card front, so I just glued it inside on the bottom left.

Inside with sailboat - Stamp4Joy.com
Card Making Mistake side closeup - Stamp4Joy.com
Things happen!

This card is a good reminder that card making mistakes are just part of the process — and sometimes they lead to the most interesting results.

Do you usually try to fix mistakes or just start over?  I think I did a pretty good job fixing my mistakes.  I'd love to hear what you think!

Check out this common stamping mistake I've made more times than I care to admit!

Most of these items will be available when the new May-August Catalog goes live May 5th.  Stay tuned!

Handmade Get Well Card Idea with a Lighthearted Touch

Handmade Get Well Card Idea - Stamp4Joy.com

Handmade get well card idea with a lighthearted touch

This handmade get well card idea came from wanting to send something thoughtful, but also a little lighthearted.

Sometimes when someone isn’t feeling well, especially when there are more questions than answers, it can be hard to know what to say.  This get well card was my way of keeping things simple and gentle, while still letting them know I’m thinking of them.

I just can't seem to quit this set!

I keep reaching for this one, and I don’t even think twice about it anymore.  It’s one of those sets that just works, especially when I want something meaningful without a lot of extra fuss.

I started with a Very Vanilla card base.  Then I layered on a piece of striped designer paper from the upcoming Silly Old Bear Collection.  I mounted that onto Early Espresso cardstock to give it a bit of definition before attaching it to the card front.  From there I added a strip of Old Olive Specialty Rickrack for a little texture and interest.

Handmade get well card idea details that keep it simple

For the focal point I die cut one of the images from the designer paper.  Pairing it with the sentiment “Oh, bother,” stamped in Early Espresso ink seemed perfect for this get well card.  I used one of the smaller dies from the Perennial Postage Dies to give the sentiment a soft framed look.

For a little extra detail,  without taking away from the card's simplicity, I added a few 2026–2028 In Color Dots.

This handmade get well card idea is a reminder that sometimes a simple card with a gentle message can mean the most.

Do you tend to keep your get well cards lighthearted, or more traditional?

I've been working a lot with this collection lately… I love it!  Here's a handmade love card I made recently with it.

Handmade Love Card with Soft Layers and Sweet Details

Handmade love card idea with soft layers and sweet details

This handmade love card idea is one of those designs that just feels warm and heartfelt.

I used a few pieces from the Silly Old Bear designer paper collection to build the layout, and everything coordinated so easily.  This handmade card came together by layering simple shapes and letting the focal image really shine.

For the main image I fussy cut one of the scenes from the designer paper and placed it underneath a layered frame.  I used Golden Glow cardstock to create the frame using two square dies, which makes a nice frame without adding bulk.  I then applied some Foam

Handmade Love Card Idea - Stamp4Joy.com
Handmade Love Card close-up - Stamp4Joy.com

Adhesive Strips along the edges and I cut up a Foam Adhesive Sheet to place underneath the image and keep it from sagging in the middle.  Behind that, I added a soft blue square from the paper pack to help separate the layers and give dimension to keep everything from blending together.

I started this card with a sketch from Freshly Made Sketches, which gave me a great starting point for the layout.  Sketches are one of my favorite ways to get going when I’m not quite sure where to start.  If you click on the image it will take you to the challenge.

Handmade love card idea details that bring everything together

Along the left side I added a strip of patterned paper for a little extra interest, balanced  with a narrow strip of Golden Glow cardstock on the right.

I stamped the sentiment on the same Hydrangea Hue designer paper.  It's such a sweet one.  I cut it using one of the label dies, which gives it a soft finished look.

To complete the card I added a few Hydrangea Hue dots around the sentiment and a few more elsewhere for a bit of balance.  These are from the 2026-2028 In Color Dots.

This handmade love card idea is a great example of how layering simple elements can create something really meaningful.

Do you tend to build your cards with layers like this, or keep things more minimal?

In case you missed it, here's a Winnie the Pooh friendship card I created using the same supplies.  They'll be available once the May-August 2026 Catalog goes live in a few weeks.

Winnie the Pooh Friendship Card With a Simple Sketch

Winnie the Pooh Friendship Card - Stamp4Joy.com

Winnie the Pooh friendship card with soft layered details

This Winnie the Pooh friendship card just makes me smile.  I mean, who doesn’t love Winnie the Pooh?

I started this card with a sketch from Sunday Stamps.  It was a simple layout with an oval, but I turned the card on its side to better fit the sweet little scene.

The background designer paper from the Silly Old Bear Suite really sets the tone.  It has that soft, slightly muted feel that works perfectly with Pooh.

I added a few die cut leaves using Garden Green cardstock.  To tone them down, I blended on a bit of Pecan ink and then lightly swiped Early Espresso along the edges.  That small step keeps them from feeling too bright against the subtle background.

Friendship card details that add charm

The “hunny” jar might be my favorite part.

I added Golden Glow ink using an alcohol marker to bring in that warm honey color, then finished it off with my Wink of Stella Brush for a little sparkle.  It’s subtle, but it catches the light beautifully.

The sentiment, “Old friends are the best friends” felt perfect for this card.  I can already think of a few people I’d love to send this to.

I also really love the oval frame dies from the Sweet Words & Labels bundle.  They help anchor everything while still keeping the design soft.

This Winnie the Pooh friendship card is one of those projects that feels both simple and special at the same time.

Do you ever make cards with a specific person in mind?

Here's another handmade card for a friend you might enjoy.

Basic Black Hybrid Stampin’ Pad for Blends and Watercolor

Basic Black Hybrid Stampin’ Pad - Stamp4Joy.com

Basic Black Hybrid Stampin’ Pad for coloring techniques

The new Basic Black Hybrid Stampin’ Pad is a fantastic addition for anyone who loves coloring stamped images.  Instead of keeping several black inks on your desk for different techniques, this single pad handles them all.

This ink pad works beautifully with Stampin’ Blends alcohol markers as well as watercoloring.  Simply stamp your image, allow it to dry, and then color with confidence.  The ink is formulated to resist bleeding, which means your lines stay crisp while you blend or paint.

Another feature I appreciate is the felt-style ink pad.  It gives a rich, even ink coverage that produces clean stamped images every time.

If you enjoy experimenting with different coloring styles, this ink pad simplifies the process.  It’s permanent, acid-free, and designed to give consistent results whether you’re using markers or watercolor techniques.  It's a great tool for both beginners and experienced stampers who want one dependable ink pad for multiple techniques.

Why the Basic Black Hybrid Stampin’ Pad is so useful

• Works with alcohol markers AND watercoloring
• Permanent ink formulation
• Felt pad for even ink coverage
• Acid-free ink
• Refill available

If you enjoy coloring your stamped images, this ink pad can make your crafting setup much simpler.  You'll want to be sure to add it to your first order.

And have you seen our new style of ink pads for our color collections?  I think you're going to love them!

Scenic Coast Stamped Card with Clean Design

Scenic Coast Stamped Card - Stamp4Joy.com

Scenic Coast stamped card with simple layered stamping

This Scenic Coast stamped card is a great example of how simple stamping can create a really beautiful scene.

Instead of using dies or layers I focused just on the stamp set and let the ink colors do the work.  This handmade card came together quickly, but still has a lot of depth thanks to the layered stamping.

I stamped the water in Lost Lagoon, which gives that soft coastal feel.  Then I added the sun and reflection using Golden Glow, which really warms up the scene.  The sailboats were stamped in Secret Sea for contrast and definition.

The focal panel was layered onto Secret Sea cardstock and then added to a white card base to keep everything clean and balanced.

Scenic Coast stamped card details with a little twist

For the sentiment I did something a little different.  I placed both sentiment lines onto a larger clear block so I could stamp them together exactly where I wanted.  The top line sits near the upper portion of the panel, while the second line anchors the bottom underneath the stamped scene.

You could easily move the second sentiment inside the card, but I liked the unexpected look of having both on the front.

To finish it off, I added a few Sunset Sparkle Sequins for just a touch of shimmer.

This Scenic Coast stamped card is a reminder that you don’t always need a lot of layers to create something that feels complete.

Many of these products will be available in the upcoming May-August 2026 Catalog.  A few days ago I highlighted a retirement card I made with this same suite.

Do you enjoy simple stamping like this or do you usually reach for dies and layers?